Making a Research Prototype
The last round of user research for my project with Mozilla’s Connected Devices team threw up a ton of useful ideas and insights. We shuffled them around on a gazillion post-its and narrowed in eventually on a theme of communication - specifically simple, non-intrusive/non-interrupting ambient messages. We saw a recurring need for ways to say “I’m still here”, “I’m OK”, “I’m thinking of you”. I was reminded of the Goodnight Lamp - one of the first really nice IoT products I remember seeing.
We wanted to validate our thoughts, and dig a little deeper into this area, so we came up with another study, this time using a simple functional prototype. Not so much a product prototype, more a prop and a way to move away from the abstract and focus in on actual reactions when interacting with a thing. In this post I’ll go into some detail on what we built, how we went about it and what we learnt.
Defining the Prototype
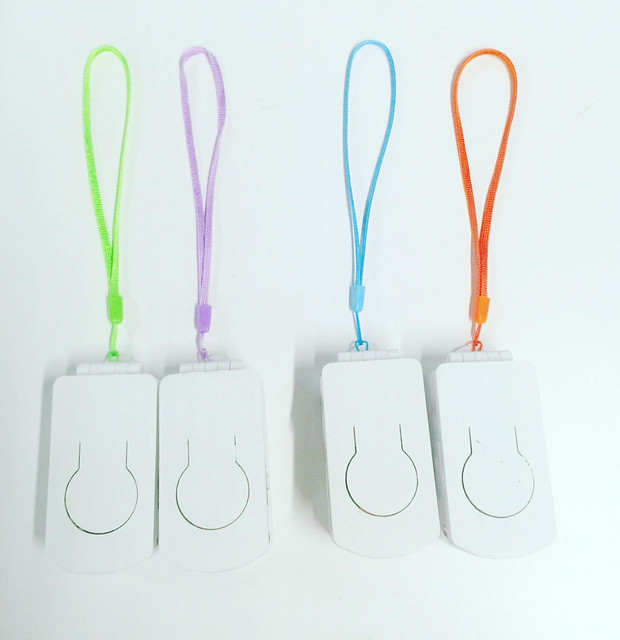
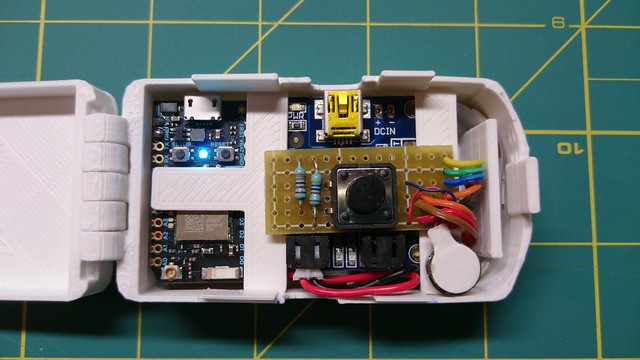
As the team discussed building some simple connected device that lets you click to blink some LEDs on a corresponding remote device, I remembered Particle’s Internet Button. This was a lot of what we wanted, maybe even enough to conduct the study with as-is? Turns out not quite. There’s options for hooking up a power source, but nothing in the package for maintaining a battery. I toyed briefly with the idea of just taping a USB power pack to it and calling it good. But it would have been unwieldy and bulky, and still left a need for some kind of enclosure to isolate one of 4 buttons we’d hooked up, and keep the bare PCB out of harm’s way. It did help us validate some ideas (a prototype prototype?) and the device we ended up building remained hardware-compatible so we could work on the code and interactions, while the prototype itself was in-progress. We ended up combining a Particle Photon board, with a LiPo charger module from Adafruit and some “neopixel”-style addressable LED strip in a 3d printed enclosure, powered by a 2000mAh LiPo battery.
The study we proposed was to give 5 pairs of 12-15yr old girls a device each, configured so that a click on one resulted in a LED animation on the other. They would live with these for 5 days - with minimal instruction from us - and we would interview before, after and gather telemetry data for the study period to see how they ended up using the devices. We needed a WiFi connection to function, and providing a low-friction way to configure that was a top priority. We used the soft access-point method to get SSID and password onto the device. WiFi is also pretty power-hungry, and it was clear early on that the battery would need charging each night for the device to last the duration of the study.
Reflections on the Process
So, how did it go? I wont go into details here, but designing the enclosure in OpenSCAD and printing on the Lulzbot Mini purchased for this purpose was a very manageble learning curve and ultimately left me feeling confident in churning out the 14+ devices (10 for the study participants, and some for the team) in time for the study. After we were done, I did order a print of the enclosure model from Shapeways to try out that process, and the result was great, but at 1 week from submitting the order to receiving the thing, pretty much a non-starter for the design/iteration phase.
For the electronics, I didn’t end up with a lot of time to really explore options and the result was perhaps a bit clunkier than it needed to be. The footprint of the battery charging module was needlessly big, but the power requirements for an always-on Wifi connection were really the driver for the size and shape of the device; we needed at least 2000mAh, and there’s no getting around the size of battery needed for that capacity. For this project I elected not to try and produce a custom PCB for mounting the button and other connections - it worked out pretty cleanly on a small piece of stripboard. After some shuffling and soldering and de-soldering, I got it packed down into as small an envelope as I could manage, and designed the enclosure around that.
Documentation
One of the secondary goals of the study was to have a go at documenting and sharing the device design - so that anyone could build their own and adapt it to their needs. We wanted to make some headway on understanding what it meant to “deliver” an open hardware project. We ended up with a high-level summary in the README, and more detailed instructions in a document - detailing each step in the device building, software flashing and configuration process. I produced a 3-part series of step-by-step build videos, captured while I was making device #8 or so. Going the last mile to produce this documentation was - as always - instructive in itself. Some hand-drawn wiring diagrams and my videos were used to build a device and produce the details instructions. Then another team member used our docs to build out the prototype on a breadboard - finding a couple bugs along the way but ultimately with success.
A Few Takeaways
The stripboard was a stumbling block - I wasn’t able to find a pre-made stripboard/veroboard small enough that would meet requirements, and that stuff can be hard to cut neatly (I used a modelmaker’s miniature table saw.) A PCB layout might have been an improvement, but that too is a pretty high bar unless you have done a lot of this kind of thing before.
Having a 3D Printer next to me on my desk was pretty awesome for this kind of project. The end result was good enough quality-wise, and the turnaround time to try the result of a change to the model made it possible to go through lots of iterations and make lots of mistakes along the way.
Even though OpenSCAD is kind of doing 3D design the hard way - you must write code to describe the 3D volumes - it results in version-control-friendly files and was a much more familiar process for someone already comfortable with code. It was easy to get repeatable precision, and to use and adapt other’s libraries of shapes. Having said that, getting any kind of organic, flowing design would be very difficult with this method, so it may be the wrong tool for a final design.
While relying on WiFi for this prototype was just a matter of convenience and expediency, its still clear that for an always-on, portable/wearable device, WiFi is probably a non-starter. We could have experimented with sleeping the device and only waking up after n minutes to update, but for this study we really wanted a real-time, always-connected experience. If we continue down this path, we’ll look at alternatives like Bluetooth LE to allow us to both shrink the device and require less frequent charging.
Final Thoughts and What’s Next
In wanting to understand a new (to us at least) user experience, it feels really important to be able to prototype each aspect of that experience ourselves. Producing a physical thing with real functionality and putting that into the hands of kids gives us a deeply informed, joined-up perspective that I think would hard to get otherwise. It comes at a cost though - this study took weeks to complete from when we first defined what we wanted to when we had the data from it. That is too slow a cadence to undertake a similar process for each idea we want to validate, but I think on balance was the right thing to do at this time, for this project. It gave us some valuable hands-on experience, an opportunity to dry-run data collection and troubleshooting of devices in the field, to run headlong into important IoT and wearable challenges and fight our way through them.
For next steps, we’ve not yet defined our next study - but there will be one. In the meantime I’m starting to play with BLE and what will be involved in making a functional prototype using it. We’ll need to think hard about which ideas we can explore and validate with low-fi techniques like paper prototyping, and which need the effort and fidelity of another functional prototype. For the delivery and distribution end, I’ve since made contact with the Wevolver folks and others involved with open hardware and we might try some of the conventions they have established for collaboration and delivery of open hardware projects.

